Overview
Web push notification consists of two parts:
- Push API
- Notification API
Push API enables the developers to take the message to the users even if they are not on their site.
Notification API helps to present small chunks of information to a user.
How it works?
Client side

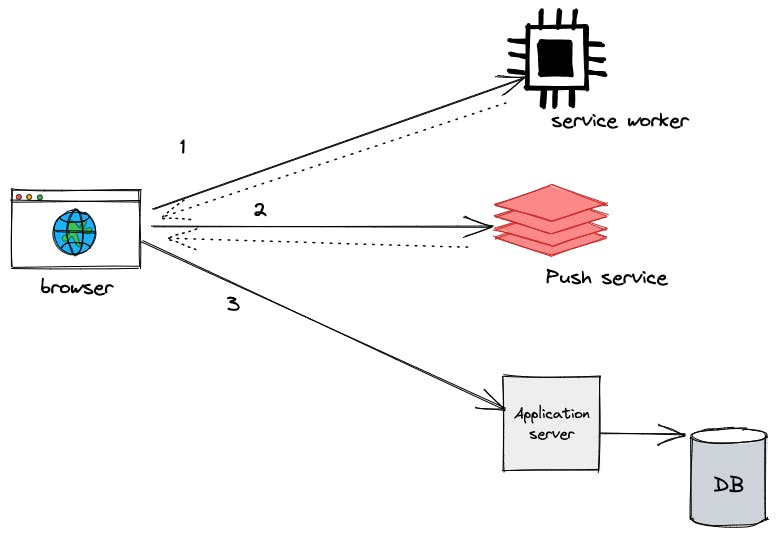
1.) Register a service worker to your app. You'll get a promise that resolves to aServiceWorkerRegistration object.
const registration = await navigator.serviceWorker.register('./service-worker.js', {scope:'/'});
2.) Using the ServiceWorkerRegistration object that we got earlier, use the subscribe method of the PushManager to create a PushSubscription object.
PushSubscription object contains the unique details that are sufficient to identify the user to send the push messages. The endpoint is unique to each client. A PushSubscription object looks like this:
{ "endpoint": "fcm.googleapis.com/fcm/send/c1KrmpTuRm…", "expirationTime": null, "keys": { "p256dh": "BGyyVt9FFV…", "auth": "R9sidzkcdf…" } }
const subscribeOptions = {
  userVisibleOnly: true,
  applicationServerKey: urlBase64ToUint8Array(VAPID_PUBLIC_KEY) //we'll cover this later in the article
 };
const pushSubscription = await registration.pushManager.subscribe(subscribeOptions);
But what is
VAPID_PUBLIC_KEY?? Let's see later in this article.
3.) Now, for the app to send push messages to the user, it has to get hold of the subscription endpoint. But, how will the app get it?
Correct, we'll make a POST call to the server and store it in the database.
await postToServer('/add-subscription', pushSubscription);
This is all you have to do on the client side.
Server side

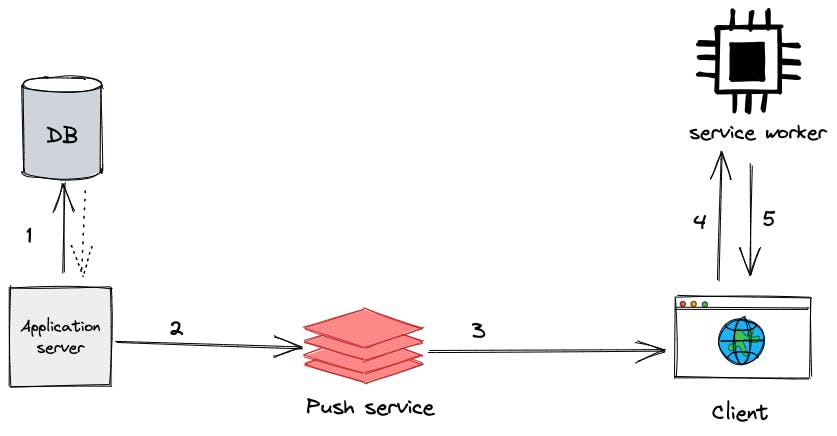
1.) When the app decides to notify the user(s), the server gets the PushSubscription object of that/those user(s) from the DB it is stored.
2.) And the server makes a web push protocol request to the push service. web-push library helps us to do this.
const vapidDetails = {
    subject: process.env.VAPID_SUBJECT,
    publicKey: process.env.VAPID_PUBLIC_KEY,
    privateKey: process.env.VAPID_PRIVATE_KEY,
};
const options = {
   vapidDetails: vapidDetails
};
await webpush.sendNotification(subscription, notification, options)
3.) The push service receives your request, authenticates it, and routes the push message to the appropriate client.
4.) When a client browser receives a pushed message, it decrypts the push message data and dispatches a push event to your service worker.
5.) In your service worker, push event is triggered. In the push event handler, you call ServiceWorkerRegistration.showNotification() to display the information as a notification.
self.addEventListener('push', (event) => {
    let notification = event.data.json();
    const options = {
        ...notification.options,
        icon: 'icon.png',
        image: 'image.png',
        badge: 'badge.png'
        //there are a lot more options available
    }
    self.registration.showNotification(
        notification.title,
        options
    );
});
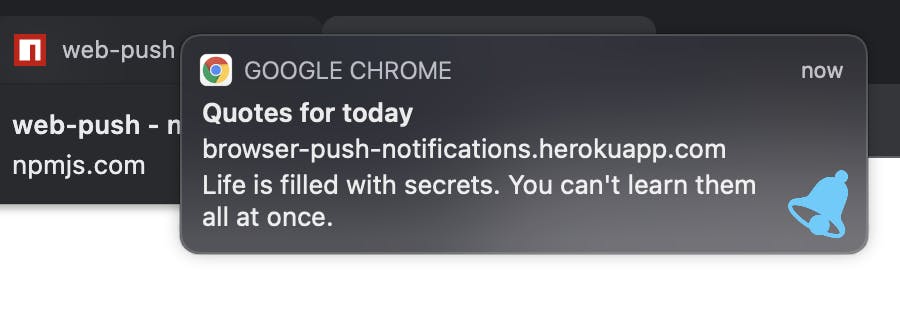
Yay🎉🎉, it's all done. Users will now see notifications like below in their browser.

Wait, do you remember the VAPID thing I mentioned earlier? Let's see what it is.
VAPID
The application server keys, also known as VAPID keys, are unique to your server. They allow a push service to know which application server subscribed a user and ensure that it's the same server triggering the push messages to that user.
It makes sure that no other server is trying to send notifications to the client.
How it works?
Using the web-push library, we can generate VAPID keys like
npx web-push generate-vapid-keys
You'll get a private key and a public key.
When subscribing to the pushManager (client side - point 2), we have to use the Public key.
When the server makes a web push protocol request to the push service (server side - point 2), it uses both public and private keys.
The push service takes care of the authentication. It allows the server to communicate the message to the client only if the keys match.
Is this all the code we need to enable push notifications in our app? Definitely not! 😛 Obviously, we need to handle feature detection, error scenarios, etc as well.
Somethings like,
const isNotificationAPISupported = () => 'Notification' in window;
const isNotificationPermissionAllowed = () => Notification.permission === 'granted';
const askNotificationPermission = () => Notification.requestPermission();

const isServiceWorkerAvailable = () => 'serviceWorker' in navigator;
const isPushSupported = () => 'PushManager' in window;
I've tried to cover the topic as simple as possible. This is just to give an overview of what Web Push Notification is and how it works.
MDN docs:
Demo
You can see a live demo here: Browser push notifications
Code
You can find the source code here: web-push-notification
